GitHub actions offers the power of Azure automation but in a far simpler and easy-to-use package, reducing the requirements and setup needed to get your automation off the ground. There are some things Azure still does better but for the most part, GitHub provides a wealthy estate of information and “out of the box” solutions for automating almost any workflow.
What can you automate?
Automation provides a ton of capabilities to power and maintain your project, large or small, primarily with the focus on maintaining reliability and giving you an early warning of any potential problems that may be creeping into your project.
Automation can provide:
- Quick checks to ensure work is assigned correctly in your project.
- Validating information provided by the team or customers is accurate.
- Unit test validation (if you’re writing Unit tests, if you are not, why not?)
- Build testing for multiple platforms as required
- Automated Version control, to ensure project/package versions are maintained (you really do not want 500 copies of version 1.0 of your project do you?)
The list goes on and in most cases, you are just organising what you want to test rather than writing lots of code to build your tests (in your workflow)
The GitHub Action Marketplace
Azure Pipelines has a huge marketplace for pre-built workflows (things to do) to automate your work, GitHub too also has a growing marketplace, albeit a little harder to navigate, but nonetheless, still growing.
GitHub provides the basics right out of the door for you, everything from grabbing code, to setting up environments and GitHub pages.
You can find all the Official GitHub actions here - https://github.com/actions
GitHub also provides several starter workflows and guidance for constructing your flows.
Alongside the GitHub provided actions is a wealthy repository of community-written actions providing almost anything you need for your automation, including some that built up from GitHub’s own Actions.
You can find the GitHub Actions marketplace here - https://github.com/marketplace?type=actions
Although, like with any other community driven content, care must be taken to ensure the action does what you need, but you will always have several to choose from. But rest assured, ALL THE SOURCE for each action is published, as it is a requirement for getting it listed on the marketplace.
Automation images or Self-hosting
The main (and likely only) cost for automation is the time and processing power needed to run your automation, in the majority of cases this is very minor and GitHub provides quite a substantial “free” level of processing time for running actions (and fairly reasonable costs for extra).
GitHub hosting
Depending on the requirements to run your actions, GitHub provides several “images” on their platform to run your code for you:
| Image |
YAML Label |
Included Software |
Rollout Progress of Latest Image Release |
| Ubuntu 22.04 |
ubuntu-22.04 |
[ubuntu-22.04] |
 |
| Ubuntu 20.04 |
ubuntu-latest or ubuntu-20.04 |
[ubuntu-20.04] |
 |
| Ubuntu 18.04 deprecated |
ubuntu-18.04 |
[ubuntu-18.04] |
 |
| macOS 12 |
macos-12 |
[macOS-12] |
 |
| macOS 11 |
macos-latest or macos-11 |
[macOS-11] |
 |
| macOS 10.15 deprecated |
macos-10.15 |
[macOS-10.15] |
 |
| Windows Server 2022 |
windows-latest or windows-2022 |
[windows-2022] |
 |
| Windows Server 2019 |
windows-2019 |
[windows-2019] |
 |
You can find all the details on GitHub’s images here - https://github.com/actions/runner-images
Essentially, these are cloud-hosted environments to run your automation.
Self Hosting
The alternative is to “Self Host”, simply meaning that instead of using a GitHub server, you will be using your own box, be that a custom-built machine sitting in your cupboard or even your own workstation (having things run in the background seamlessly). You only need to make sure all the required software is installed (e.g. Unity if you are doing Unity builds and NodeJS if you are running NPM commands) and register your Host as a “GitHub Runner”. If you want, you can even setup multiple runners on the same machine for parallelising your workloads (just be careful how many you register so as not to overdo it on a single machine, especially if it is your developer workstation).
Self-Hosting is by far the cheapest option as it is your own hardware running all the tasks and GitHub will not charge you a thing.
Setting up Self-hosted agents
Your first workflow
The GitHub actions Starter Workflows repository gives you several “out of the box” solutions for workflows, including:
Once you learn to read and build your own workflows, these are quite easy to follow, take the DotNet base workflow for example:
# This workflow will build a .NET project
# For more information see: https://docs.github.com/en/actions/automating-builds-and-tests/building-and-testing-net

name: .NET

on:
  push:
    branches: [ $default-branch ]
  pull_request:
    branches: [ $default-branch ]

jobs:
  build:

    runs-on: ubuntu-latest

    steps:
    - uses: actions/checkout@v3
    - name: Setup .NET
      uses: actions/setup-dotnet@v3
      with:
        dotnet-version: 6.0.x
    - name: Restore dependencies
      run: dotnet restore
    - name: Build
      run: dotnet build --no-restore
    - name: Test
      run: dotnet test --no-build --verbosity normal
The workflow is made up of several easy-to-understand sections:
1. Name
Each workflow needs a name, mainly so you can remember what it is for, but also it is what you see when the workflow is running in the Projects Actions tab for your repository.
2. Trigger
The Trigger is an event that occurs in the GitHub API which each workflow will monitor and then run when the conditions are met.
The most common trigger is the “Push” (when code is pushed to a branch) or “Pull_Request”” (when a PR is raised or updated from a push), however, if you check the list of things that can be “triggered” almost anything can be a trigger, from comments, to new issues and more. Want a workflow that will email you when a new issue is created, or require customers to fill in certain fields when logging an issue, then workflows are there for you.
With most triggers, you also specify a “Condition” to determine the requirements when a trigger occurs, in the example above, the workflow will “run” when either a Pull Request or a Push is made to the “Default Branch” of your repository.
3. Jobs
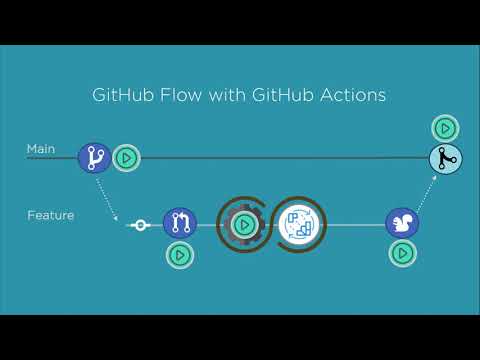
Jobs are simply a batch of work that will run on a single GitHub Runner (self-hosted or Github server). Each job is SELF-CONTAINED meaning that the work it carries out is isolated from any other work when it performs its tasks (steps). If two jobs are running on the same machine, they simply do not know about each other and cannot (by default) share work or information.
You can have multiple jobs defined in a single workflow and even have dependencies (Job 1 runs, but Job 2 requires Job 1 to finish successfully to run) between jobs. There is a lot you can do but for the most part and in the majority of workflows I have developed, one job is usually enough.
In a Job, you define what it Runs-on (the host) and then a list of Steps (or tasks) to run in sequence. You can even make “conditional statements” to state “IF”” a job should run, e.g. “Run this job IF the users name is X”. (conditionals can also be applied to Steps, see later).
4. Steps
Steps are exactly how they sound, like walking, you take one step and then the next (providing you have not fallen down in-between steps). Steps can also be given names and in most cases require parameters (With statements) in order to function, always check the documentation for a GitHub Action if you are unsure.
In the example above the Steps are:
- Checkout the latest code from the branch the workflow was triggered on (actions/checkout@v3)
- .NET is installed on the host, remembering that you need to validate the environment your action is running on to avoid it failing. This workflow needs the .NET runtime installed, so we check that it is installed and install it if is not (actions/setup-dotnet@v3), we also pass a parameter in the with clause to state which version we need (with: dotnet-version: 6.0.x)
- We then run the DotNet command to restore any dependencies the project needs (as they are not usually in source) with the run command (run: dotnet restore) which executes in a terminal on the host.
- With the project and all its dependencies ready, we run the DotNet build command to generate the project (dotnet build –no-restore)
- Finally we run any testing code in our build to ensure everything is working as expected (dotnet test –no-build –verbosity normal) using the build we just generated.
One thing to keep in mind is that By Default ANY step that fails will prevent any further steps from being run as GitHub actions fails on any exception. You can override this (especially if you are building for multiple platforms) if you want, or you can leave it at the default.
Putting your GitHub workflow into Action
(see what I did there :D )
Once you have created your workflow (or grabbed one from someone else), you simply need to get it “checked-in” to the repository you want it to run on, the primary requirement is that it MUST be available on the branch that it is targetting (in your trigger) or in the Default branch for anything that uses non-branch specific triggers (e.g. comments / issues).
If specify a trigger based on ‘workflow_dispatch:’, you can also run the workflow Manually from the GitHub Actions tab in your repository. Useful for testing.
on:
  # Allows you to run this workflow manually from the Actions tab
  workflow_dispatch:
You just need to place the yml (Yaml script) file into the following directory structure for GitHub to recognise and pick up your workflow:
-> Root
-> .github
-> workflows
Once there and checked-in/committed, it will show up in your repositories Actions tab (provided you have enabled the Actions tab in your Project settings)

You will see the list of actions that have been detected by the GitHub API as well as a list of the previous runs and results for each workflow.
Too much more to mention
There is soo much more that can be done with GitHub actions beyond the basics shown here, but you should now have a taste of what is in store, from the basics to the advanced.
Check the GitHub docs and learning portal for more.
If you need to also check out the costs, have a look at the pricing page where you will be nicely surprised just how much time you get for free.
Any questions, leave a comment below.
Simon (darkside) Jackson
Engineer, industry executive, research enthusiast. Avid learner with diverse interests in coding, game development, Mixed Reality (AR/VR/XR) and reinforcement learning. 25+ years of experience working in multinational corporations and startups.

Comments